In my previous article, I have explained about features of WordPress. In this article we will see how can we setup our account on WordPress.com. WordPress is available for free download that can be installed on your machine, servers or any other hosting services provider. If you want to super flexibility then you can download WordPress and install on your hosting services providers such as iPage, Godaddy etc or your own Server. but for that, you will have to pay hosting charges to those hosting services provider companies. If you are a beginner and want to try your hands on WordPress, Would recommend to use WordPress Online which is available on WordPress.com. There is free package that you can use to learn more about WordPress and even to write your first post.
Below are the Steps to Getting Started with WordPress.com
Step 1: Selecting Website Preferences
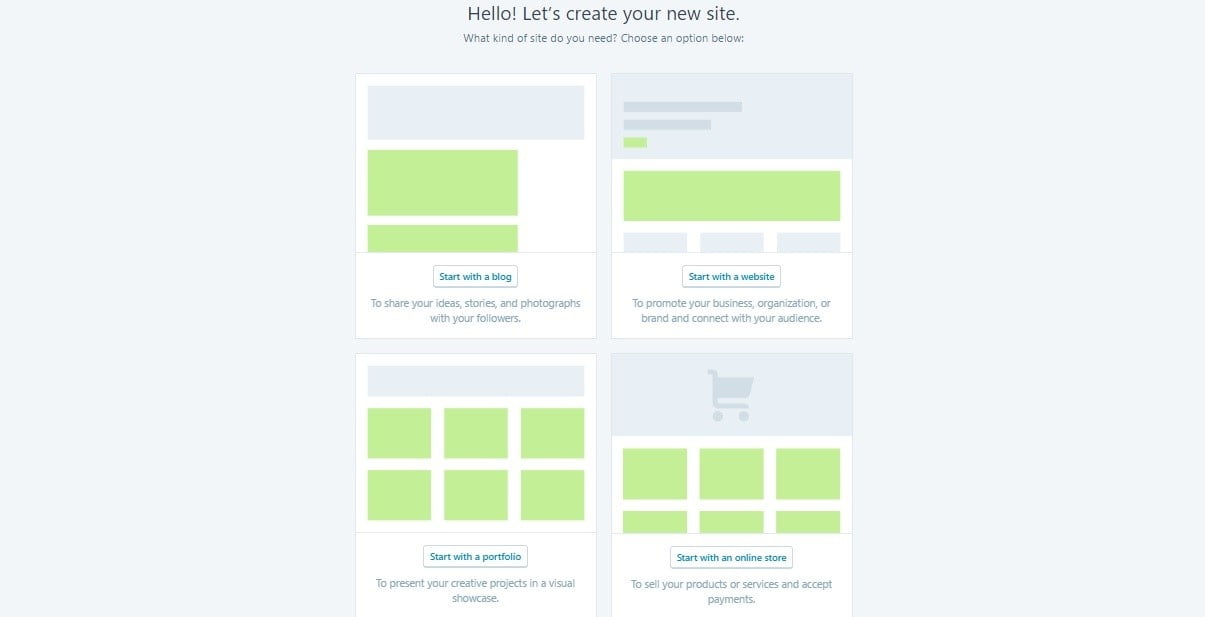
Choose between whether to start with a basic setup for a blog / a website / a portfolio or an online store. To select one go to : https://wordpress.com/start/website/design-type-with-store and follow the instructions provided below.
Here is the explanation for all of these options:-
Blog: Blog writing basically consists of writing articles on a specific topic. This might be your personal blog describing you or containing the posts related to you this might be related to a particular niche. Various options in your mind could be a Fashion Blogger, Tech Blogger, Health and Fitness Tips Provider or Lifestyle Blogger.
Website: If you are looking to promote your business through your website, then this option is for you. This will help reach your business to people out there and also help to interact with you audience in a much easier way. This option is also suitable to someone who wants to start a new online business and want to have a brand name online and generate some user base.
Portfolio: Portfolio basically describes you and helps you to describe yourself in a much better and attractive ways. You will be able to showcase your skills, capabilities and achievements in online market or to anyone you want through great visuals. This might also work like a resume or as a professional profile to get yourself introduced to a professional setup.
Online Store: With Flipkart, Amazon, PayTM and some other online stores getting this much popular, I might not need to introduce this category to you. If you want to set up an online store and plan to have an online business, like Flipkart or Amazon, then this option is for you. Mind you, you don’t need to have a much larger idea to get started with this, this could also be for some professional manufacturers or designers to showcase their products and sell them online.
Make your choice carefully keeping in mind the purpose for which you need a website. You can still customize certain options afterwards, but it’s better to get started in the way you want it to finally look like. Moreover, this option will decide what type of themes you require in step 2.
Step 2: Choosing a Theme
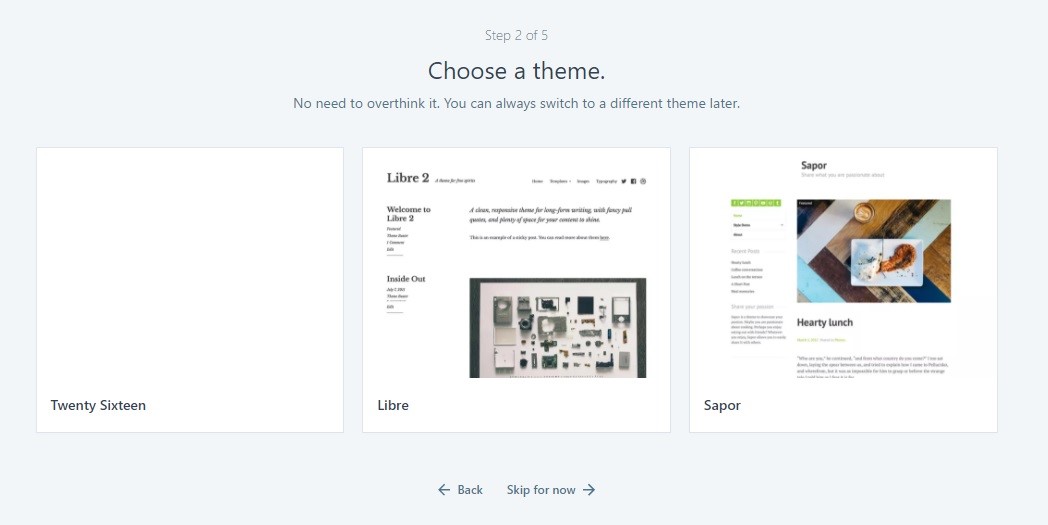
As mentioned you don’t need to over think as you can always change the theme later, but here is an advice for you, changing themes after adding some blog posts is never a good option. Start with the one which you feel comfortable with and looks attractive for your business.
Step 3: Giving a Name to your Website/blog
Here comes an important step, if you already own a domain you can choose that, but if you don’t, you just need to select a suitable name for your business which will be checked for the availability and if available will be provided to you. It is absolutely free of cost provided that your website name will of type www.example.wordpress.com
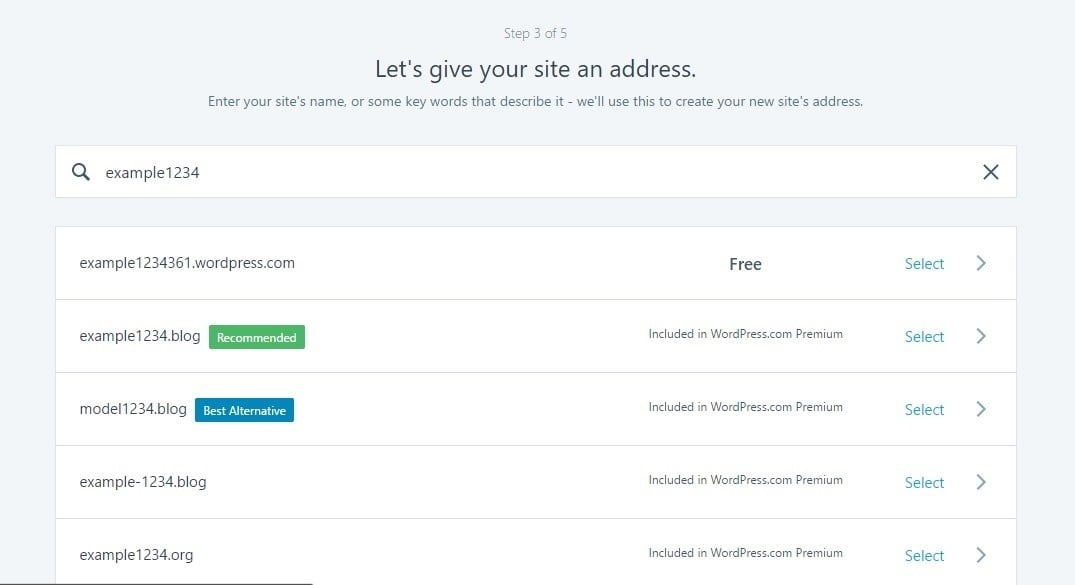
Advice: Don’t choose any random name as this cannot be changed later and believe me, this matters a lot. Having a unique and an attractive name for your business can help you grow it faster. So, you need to give it some time, think for it and then go for your choice. From the drop-down options, select the first one which provides you free access to your website.
Step 4: Picking Suitable Plan for your Website

Here is a brief comparison of all the plans to help you choose one.
Free: If you simply don’t want to invest right now, go for the free plan and have some experience on how a website works and what it need to keep maintained and updated. You won’t be able to monetize it with ads and get only 3GB of online storage.
Personal ($2.99 per month): Here you can opt for a custom domain, remove the WordPress ads and the storage increases to 6GB.
Premium ($8.25 per month): Here you get some additional premium themes, Advanced Design Customization, 13GB of online storage and most importantly, you can monetize your site.
Business($24.92 per month):Here you get Unlimited Online Storage, Get Personalized Help, can upload themes, Install Plug-in, and use Google Analytics Integration.
How to choose: Again, if you are new to all this and just want to have some experience for maintaining a website, just go for the free plan. If you just want to use a custom domain for your business or your portfolio and doesn’t want to monetize your site, go for the personal. And if you want to use your website for professional blogging and want to earn something out of it, you will have to opt for a premium or business plan.
Note: Billing is done on a yearly basis.
Step 5: Create your account on WordPress
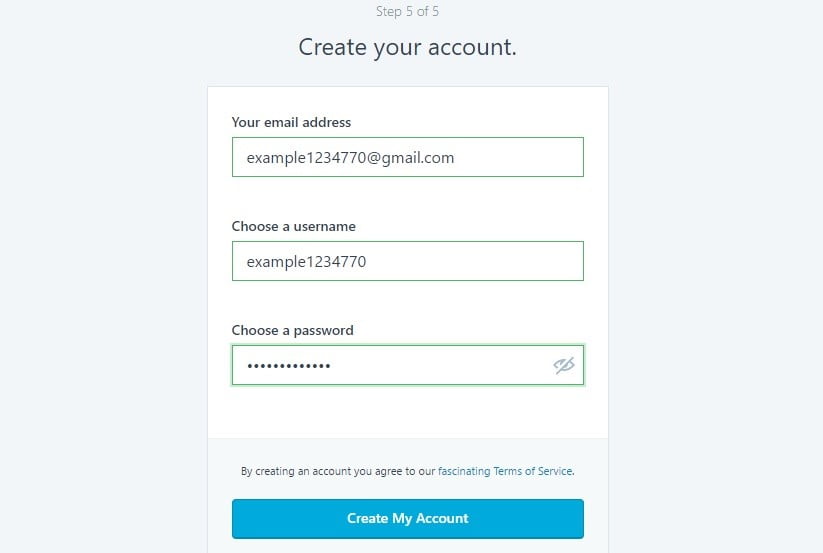 Finally, you need to create your account to get started with your website and publish it. Type in your email address, choose a username and chose a high security password for your WordPress account.
After these 5 steps, you have finally setup your WordPress website and mind you, this is just the starting. After carefully following all these steps, you need to customize your website and add some content to it to get your website live.
Do follow my posts for any updates on this. If you have any queries or want to suggest something related to this, do comment below.

