In this article, we will see how can we create a simple android application for user login using Retrofit 2 HTTP Client. We will use Android Studio for development. The retrofit library is developed by Square to handle REST API calls. Retrofit is a type-safe REST client for Android and Java. There are various versions of Retrofit, We will use Retrofit2 in this example.
Table of Contents
Benefits of using retrofit
- Retrofit automatically serializes the JSON response using a POJO(Plain Old Java Object)
- Retrofit2 by default leverages OkHttp
Let us create a small login application, in which we will use Retrofit library to decode the JSON response. Suppose we have an API JSON output as below, let us see how to decode it.
JSON Example Output
{
    "status": true,
    "success": {
        "email": null,
        "id": 67,
        "name": "test",
        "role_id": 3,
        "full_name": "test",
        "emp_id": 67
    }
}
Include Retrofit Libraries
In biuld.gradel (Module:app) add the two libraries, we are adding these two libraries to use the retrofit.
implementation 'com.squareup.retrofit2:retrofit:2.5.0'
implementation 'com.squareup.retrofit2:converter-gson:2.3.0'
Give Permission
In the Manifest file, you have to give Internet permission to access the API.
<uses-permission android:name="android.permission.INTERNET"/>
Below is the complete code for how to give permission in Manifest file
<?xml version="1.0" encoding="utf-8"?>
<manifest xmlns:android="http://schemas.android.com/apk/res/android"
    package="com.example.myapplication">

    <uses-permission android:name="android.permission.INTERNET"/>

    <application
        android:allowBackup="true"
        android:icon="@mipmap/ic_launcher"
        android:label="@string/app_name"
        android:roundIcon="@mipmap/ic_launcher_round"
        android:supportsRtl="true"
        android:theme="@style/AppTheme">
        <activity android:name=".MainActivity">
            <intent-filter>
                <action android:name="android.intent.action.MAIN" />

                <category android:name="android.intent.category.LAUNCHER" />
            </intent-filter>
        </activity>
    </application>

</manifest>
Java Class: Create the java class Utils.class.To declare the base URL as global.
package com.example.myapplication.connections;

import android.annotation.SuppressLint;

import android.content.Context;

import android.net.ConnectivityManager;
import android.net.NetworkInfo;

public class Utils {

public static String site_url = "http://your-Apilink/";

public static final boolean isOnline(Context context) {
    ConnectivityManager cm =
            (ConnectivityManager)context.getSystemService(Context.CONNECTIVITY_SERVICE);
    @SuppressLint("MissingPermission") NetworkInfo netInfo = cm.getActiveNetworkInfo();
    return netInfo != null && netInfo.isConnectedOrConnecting();
}


}
Create Service handler
Create the Class with the name RetrofitClient.class to handle the service request
package com.example.myapplication.connections;

import retrofit2.Retrofit;

public class RetrofitClient {

    private static Retrofit retrofit = null;

    public static Service getClient() {
        if (retrofit == null) {
            retrofit = new Retrofit.Builder()
                    .baseUrl(Utils.site_url)
                    .build();
        }
        final Service service = retrofit.create(Service.class);
        return service;
    }

}
Now Call the service
Create the Service.class to call the service
package com.example.myapplication.connections;


import okhttp3.ResponseBody;
import retrofit2.Call;
import retrofit2.http.Field;
import retrofit2.http.FormUrlEncoded;
import retrofit2.http.POST;

public interface Service {

  @FormUrlEncoded
  @POST("logincheck")
  Call<ResponseBody> userlogin(@Field("username") String username, @Field("password") String password);


}
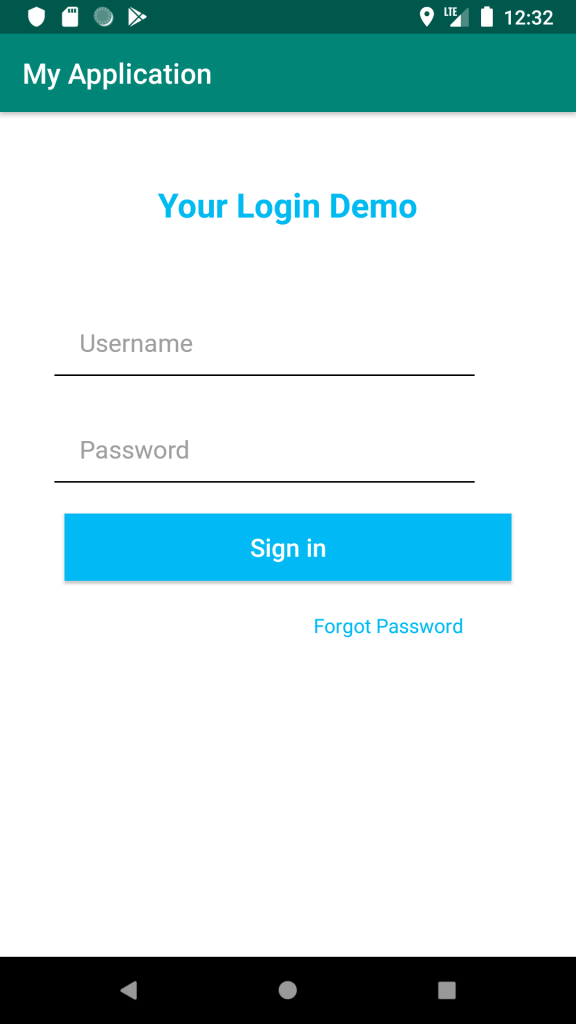
Create the Layout for the Login screen.

XML Code for the above login screen below
<?xml version="1.0" encoding="utf-8"?>
<ScrollView xmlns:android="http://schemas.android.com/apk/res/android"
    android:layout_width="fill_parent"
    android:layout_height="fill_parent"
    android:background="#fff"
    android:fitsSystemWindows="true">

    <LinearLayout
        android:layout_width="match_parent"
        android:layout_height="wrap_content"
        android:background="#fff"
        android:orientation="vertical"
        android:paddingLeft="24dp"
        android:paddingRight="24dp">

        <LinearLayout
            android:layout_width="match_parent"
            android:layout_height="wrap_content"
            android:layout_gravity="center"
            android:layout_marginTop="50dp"
            android:gravity="center"
            android:orientation="horizontal">

            <TextView
                android:layout_width="wrap_content"
                android:layout_height="wrap_content"
                android:layout_gravity="center"
                android:gravity="center"
                android:text="Your Login Demo"
                android:textColor="#00BAF2"
                android:textSize="24dp"
                android:textStyle="bold" />
        </LinearLayout>
        <LinearLayout
            android:layout_width="fill_parent"
            android:layout_height="wrap_content"
            android:focusable="true"
            android:focusableInTouchMode="true"
            android:orientation="vertical"
            android:paddingTop="30dp">
            <android.support.design.widget.TextInputLayout
                android:layout_width="match_parent"
                android:layout_height="wrap_content"
                android:layout_marginTop="20dp"
                android:backgroundTint="#0c53e2">

                <EditText
                    android:id="@+id/input_username"
                    android:layout_width="match_parent"
                    android:layout_height="wrap_content"
                    android:background="@null"
                    android:hint="     Username "
                    android:maxLength="10"
                    android:padding="10dp"
                    android:singleLine="true"
                    android:textColor="#000"
                    android:textColorHint="#000" />

                <View
                    android:layout_width="300dp"
                    android:layout_height="1dp"
                    android:layout_marginLeft="15dp"
                    android:background="@android:color/black" />
            </android.support.design.widget.TextInputLayout>


            <android.support.design.widget.TextInputLayout
                android:layout_width="match_parent"
                android:layout_height="wrap_content"
                android:layout_marginTop="20dp"
                android:backgroundTint="#0c53e2">

                <EditText
                    android:id="@+id/input_password"
                    android:layout_width="match_parent"
                    android:layout_height="wrap_content"
                    android:background="@null"
                    android:hint="     Password "
                    android:padding="10dp"
                    android:singleLine="true"
                    android:textColor="#000"
                    android:textColorHint="#000" />

                <View
                    android:layout_width="300dp"
                    android:layout_height="1dp"
                    android:layout_marginLeft="15dp"
                    android:background="@android:color/black" />
            </android.support.design.widget.TextInputLayout>


            <Button
                android:id="@+id/btn_login"
                android:layout_width="fill_parent"
                android:layout_height="wrap_content"
                android:layout_margin="22dp"
                android:background="#00B9F5"
                android:text="Sign in"
                android:textAllCaps="false"
                android:textColor="#fff"
                android:textSize="18sp" />
        </LinearLayout>

        <TextView
            android:layout_width="wrap_content"
            android:layout_height="wrap_content"
            android:layout_marginLeft="200dp"
            android:text="Forgot Password"
            android:textColor="#00BAF2" />


    </LinearLayout>

</ScrollView>
Create the login activity
package com.example.myapplication;

import android.content.Intent;
import android.support.v7.app.AppCompatActivity;
import android.os.Bundle;
import android.view.View;

import android.widget.Button;
import android.widget.EditText;

import android.widget.Toast;

import com.example.myapplication.connections.RetrofitClient;

import org.json.JSONObject;

import okhttp3.ResponseBody;
import retrofit2.Call;
import retrofit2.Callback;
import retrofit2.Response;

public class MainActivity extends AppCompatActivity {
    EditText input_username, input_password;
    Button btn_login;

    @Override
    protected void onCreate(Bundle savedInstanceState) {
        super.onCreate(savedInstanceState);
        setContentView(R.layout.activity_main);

        input_username = (EditText) findViewById(R.id.input_username);
        input_password = (EditText) findViewById(R.id.input_password);
        btn_login = (Button) findViewById(R.id.btn_login);

        btn_login.setOnClickListener(new View.OnClickListener() {  ////Button click event
            @Override
            public void onClick(View v) {

LoginCheck(input_username.getText().toString(),input_password.getText().toString());
            }
        });
    }

    public void LoginCheck(final String username, final String password) {


        Call<ResponseBody> call = RetrofitClient.getClient().userlogin(username, password);
        call.enqueue(new Callback<ResponseBody>() {
            @Override
            public void onResponse(Call<ResponseBody> call, Response<ResponseBody> response) {

                if (response.isSuccessful()) {

                    try {

                        String result = response.body().string();

                        JSONObject obj = new JSONObject(result);

                        String getstatus = obj.getString("status");

                        if (getstatus.equals("false")) {
                            String error = obj.getString("error");
                            Toast.makeText(getApplicationContext(), "" + error, Toast.LENGTH_LONG).show();
                        } else if (getstatus.equals("true")) {

                          startActivity(new Intent(getApplicationContext(),Home.class));
                        }

                    } catch (Exception e) {
                        e.printStackTrace();

                    }
                } else {

                    Toast.makeText(getApplicationContext(), "fail", Toast.LENGTH_SHORT).show();
                }
            }

            @Override
            public void onFailure(Call<ResponseBody> call, Throwable t) {
                Toast.makeText(getApplicationContext(), "" + t, Toast.LENGTH_SHORT).show();

            }
        });

    }
}
Here in Login Activity, we have decoded the API. If we get a status as true, then the login is successful and the user is a valid user. Once the user is validated, we can redirect the user to another screen or can perform other task based on the requirement. In the example above, after getting status as true, we are redirecting to Home.class.
If you get staus as false then the user is not valid, and you can show them the error message or perform any other task, like redirecting them to the registration page.
So, in this article, we have seen how can we create login functionality using Retrofit.


